Conservation of tooth structure
Clinical Tips, Endodontic Preparation Techniques, General Updates

Endodontic Access for Conservationists. A How To Guide.


There are a huge number of factors that can affect the outcome of endodontic therapy. Attempting to isolate these individual factors and determine the relative importance of each is something that has proven difficult or impossible in endodontic scientific literature.

Ultimately, our primary aim is to allow our patients to keep their teeth for the rest of their lives. The evidence we have available points to the majority of endodontically treated teeth surviving for long periods of time. (1) Those that are extracted most commonly fail due to non-endodontic reasons. The most common cause of extraction of root filled teeth is crown fracture and periodontal disease.(2)

In terms of crown (and root) fracture, I believe that the conservation of dentine in the crown and in the region a couple of mm just above and below the cervical area is essential to providing ongoing resistance to fracture. In order to have as strong a tooth as possible, we need maximum thickness of tooth structure in this area.

In terms of this, I see that using strategies to limit the amount of tooth structure loss during endodontic access as one of the most important measures that can be taken to ensure the greatest longevity for root filled teeth. Of course, we still need to achieve the aims of endodontic treatment, but this shouldn’t come at the cost of doing irreversible damage to the crown of the tooth that may compromise the tooth’s long term survival.

Poor endodontic access

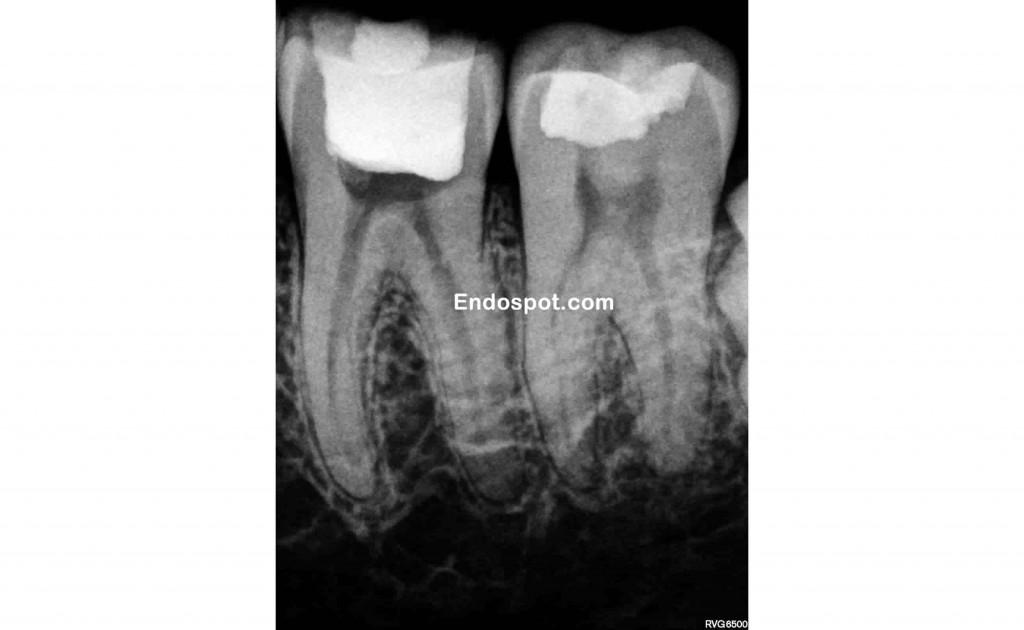
Endodontic access has been performed which gives good access to the canal orifices. But imagine the thickness of dentine that will remain mesially and distally if a crown was prepared for this tooth. The endodontics can be perfectly performed, but the tooth is compromised due to the excessive loss of tooth structure during access.

This is why we aim to keep access limited and you will sometimes see what appears to be incomplete opening of the pulp chamber. This is by design and allows important tooth structure to be maintained that contributes to the strength and durability of the tooth. Strategies for conserving tooth structure during endodontic access include removing restorations and caries and utilising this space for endodontic access. A good discussion of these strategies, along with examples can be found in articles by Clark and Khademi. (3) (4)

Conservative endodontic access in lower molar

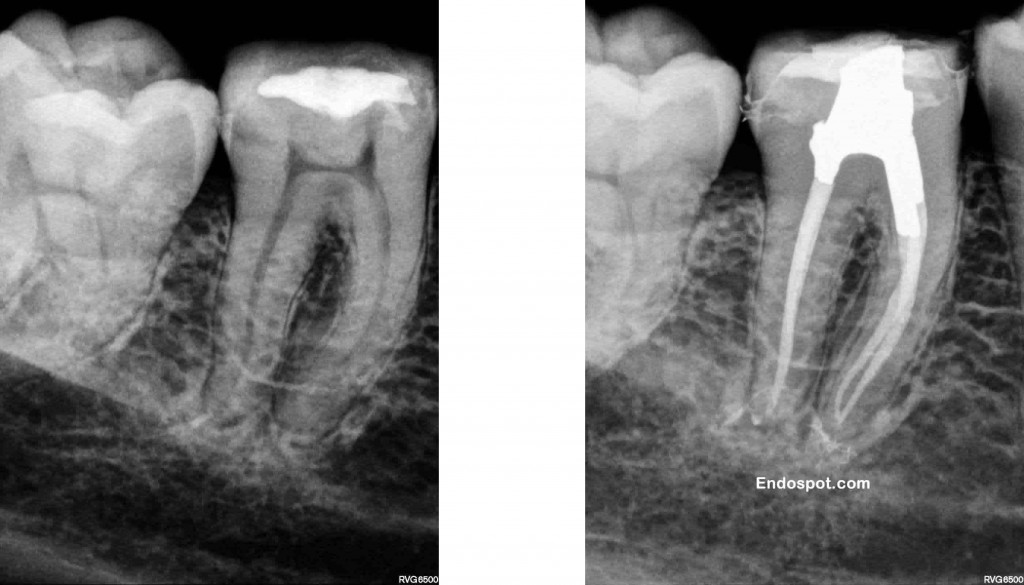
Maintaining the dentine in the peri-cervical region whilst achieving the goals of endodontics give this tooth the best possible chance of survival. Ultrasonics and copious irrigation allow the cleaning of the pulp chamber space and canal spaces without the need for excessive removal of tooth structure.

Maintaining dentine for endodontic access

The restricted access still give good straight line access to the canal orifices. But see how much solid tooth structure remains? It does, however make the job of performing high quality endodontics more difficult. But what’s more important? Us having an easy time of it, or giving the patient the best possible long term outcome?

Limiting tooth destruction becomes a greater challenge when attempting to treat teeth with calcified pulp chambers or canals. When attempting to work through pulp chamber calcification or locate these difficult to find canals it can be easy to remove vitally important dentine.  Assessing the degree of calcification prior to attempting treatment is the key to preventing this iatrogenic damage to teeth. Additionally, if upon access the location of all canals is difficult, it may be better to consider referring at that early stage, rather than to damage the tooth’s long term prognosis in an attempt to locate a difficult to find and prepare canal.

One important aspect of learning to limit the removal of healthy tooth structure for access is that it actually makes endodontic procedures much more difficult (especially in second and third molars) and increases the chances of missing canals, so you need to balance these potential issues with benefits of doing so.

1.    Salehrabi R, Rotstein I. Endodontic treatment outcomes in a large patient population in the USA: An epidemiological study. J Endod. 2004;30(12):846-50.
2.    Vire D. Failure of endodontically treated teeth: classification and evaluation. J Endod. 1991;17:338-42.
3.    Clark D, Khademi J. Modern molar endodontic access and directed dentin conservation. Dent Clin North Am. 2010 Apr;54(2):249-73.
4.    Clark D, Khademi JA. Case studies in modern molar endodontic access and directed dentin conservation. Dent Clin North Am. 2010 Apr;54(2):275-89.

Aetiology of Apical Periodontitis, Clinical Tips, Diagnosis of Pulpal Pathology

Viral Pulpitis. This Would Have to Hurt…..


We usually blame bacteria for causing pulpitis but………. This patient complained of severe irreversible pulpitis symptoms for four days, which were only just starting to settle. She couldn’t isolate to either the upper second premolar or molar. Her dentist had extirpated the molar but symptoms hadn’t changed. Pulp testing showed the premolar was also responding negatively.

Take a look at the image below. This presentation is consistent with herpes zoster, commonly referred to as shingles. It is caused by the varicella zoster virus, also responsible for chicken pox. The trigeminal nerve is an unusual location for an outbreak (approximately 1-2% of cases), but when it occurs the virus affects a particular dermatome. If this dermatome also includes teeth, the pulp can also be affected. I can only imagine how painful this would be. Long term follow up is required as multiple teeth may lose vitality.

Notice how the viral outbreak is only affecting the greater palatine nerve distribution. If the nerve innervating the teeth are involved, this can lead to pulpitis and necrosis of the pulp tissues.

Diagnosing this initially may prove difficult, as the lesions on the mucosa don’t show up until a few days after symptoms appear, but some things to look out for include pulpitis symptoms from multiple teeth and a tingling or burning sensation in the distribution of the trigeminal nerve.

Pat Caldwell

Clinical Tips, General Updates, Study Guides

An Endodontic Masterclass

This is just a short post to let you know that I will be running a hands-on course for general dentists on October 12 in Brisbane. I wanted to let Endospot followers have the first opportunity to sign up. It should be a great day with a nice mix of useful information, practical advice and hands-on experience.

You can download the course flyer here or sign up here.

I hope to see you there.

Pat Caldwell

Clinical Tips, Endodontic Preparation Techniques, General Updates, Irrigation

The Squid. A Study in Persistence and Access Design

I know it’s been a long time since I’ve posted so I thought I’d show a case that caused me some trouble recently. The owner of this tooth had suffered a significant facial swelling and ended up in hospital. Fortunately, the swelling had subsided by the time I saw him and he was keen to save the tooth.

Lower Premolar with unusual anatomy

A Wide Canal That Narrows Suddenly is an Indication of a Splitting Canal.

Lower premolar AP 2
Apical Periodontitis is Apparent. Note the Bulbous Shape of The Root.

The thing to note about this pre-op xray are that the canal appears to split at the mid root level. Even if you can’t see the split, the fact that the canal narrows suddenly is an indication of a split in the canal system. The second telling point that we are dealing with something complex is the bulbous shape of the root, when compared to the first premolar. This alone would tell us that we should be looking for anatomy other than a single canal.

I was able to locate two canals, and confirm that these canals joined apically, but I wasn’t happy with the position of the files in the radiograph. As you can see, the lingual canal was quite centred in the root, while the distobuccal canal is shifted to the distal. It doesn’t look right does it? There must be another canal.

Lower Premolar with unusual anatomy showing working length

Note the Off-Centre Location of the Second File

So…. I know to look for a third canal, but no matter how hard I looked, I just couldn’t find it. The canal were prepared and obturated, with the result below.

Initial Obturation Unusual Premolar

After Preparation and Obturation a Small Squirt of Sealer to the Mesial Confirms the Missed Anataomy

So you can see the squirt of sealer to the mesial at the mid-root point. There is no doubt that some anatomy has not been properly cleaned, and would likely be full of infected tissue. Back in we go. The GP was removed and the access expanded to allow location of the canal to be identified and confirmed with a file.

Unusual Anatomy in Premolar

There it is!

The third canal was then prepared. It too joined the other canals apically. The key to cleaning this sort of anatomy is passive ultrasonic irrigation, which I have discussed previously. The only way to then obturate is with a warm technique such as continuous wave or warm vertical. The tooth, of course needs a crown. In this case persistance paid off and the outcome can be much more certain now that the full anatomy has been cleaned and obturated. In hindsight, a cone beam CT scan may have assisted in locating the full anatomy.

Pat

Premolar with unusual anatomy

I Call This Tooth “The Squid”

Unusual Anatomy of Premolar After Obturation

The Arrow Shows the Spot Where the Missing Canal Was Located

Clinical Tips, Diagnosis of Pulpal Pathology

Pulp Testing – An Endodontist’s Best Friend

Back when I was working as an Endodontist with the Australian Navy, I often mentored newly graduated dentists. There was an interesting interaction between us that would often occur. The junior dentist would come into my surgery with a question about diagnosis. They would explain a set of symptoms and then show me a radiograph. I would then ask what the pulp test result was. The new grad would then slowly back out of the room in order to return to the patient and conduct the test.

I’m not sure why the pulp testing was left off the list, but I hope I hope that by the time the junior dentist had finished their posting and moved on to a new posting that pulp testing is one of the most important tools allowing us to to diagnose. Unfortunately, there is nothing certain when it comes to pulpal diagnosis, especially when we get to the grey area of reversible/irreversible pulpitis. If we really want to know what’s happening in the pulp and periapical area of a tooth, we need to extract it, section it, and look at it under a microscope. But that’s not practical…….

Pulp testing is not 100% accurate. If it was, then diagnosis would be much easier, but it often gives us essential information that will confirm a clinical diagnosis. When it comes to vital pulps, electric and cold testing gives a positive result 81-86% of the time (Petersson & Kiani-Anaraki, 1999). In a partially or completely necrotic tooth, these modalities will give a negative result on almost all occasions. This is useful infromation to have at hand.

Here is an example from when I was doing my post-graduate training:

Images showing importance of pulp testing

Compare these radiographs. The image on the left is the pre-op and the image on the right is the two year review.

In the case above, we can see there is a definite lucency surrounding the lower right canine and central incisor. The lateral incisor may also be involved. Pulp testing with both cold and EPT revealed the canine was testing negative and the incisors were testing positive. As only the canine was testing negative, I only treated the canine. At the two year review, we can see that the lesion has healed and normal periradicular architecture has been re-formed around the vital incisors. If we just worked from the x-rays, we’d probably treat all three teeth, and subject the patient to unnecessary treatment. This is a pretty simple lesson.

Here are the keys to successful pulp testing:

1. Make sure the teeth are completely dry and isolated with cotton wool rolls;

2. Place the tip of the pulp tester on tooth structure, not restoration, and use a small (perhaps half of a) cotton pellet or endo sponge;

3. Start your test with a tooth that you expect will give a normal result and is not involved with the area in question. This will allow the patient to get a feel for what a normal response is;

4. Test with both cold and EPT. If the patient is experiencing symptoms such as a hyper-response to hot foods/liquids, then use hot as well.

In my surgery I have the pulp tester sitting right next to me, along with things like the apex locator and endo motor. We use it that often.

References:

Petersson KS, C. Kiani-Anaraki, M. Evaluation of the ability of thermal and electrical tests to register pulp vitality Endod Dent Traumatol 1999;15:127-131.

C-shaped Canals
Clinical Tips, Endodontic Preparation Techniques, General Updates

Endospot Cases of Note. Case 1. C-Shaped Canal.

Welcome to the first Endospot Case of Note. This case is of a C-Shaped lower molar and I’ve tried my best to highlight the interesting aspects of the case, explain what can be seen using our diagnostic tools, and also how to treat these cases. As usual, I would love to hear your thoughts and you can leave a comment below.

If you want to review the anatomical variations of C-shaped canals, I recommending reading the following references:

Fan B, Cheung GS, Fan M, Gutmann JL, Bian Z (2004). C-shaped canal system in mandibular second molars: Part 1 Anatomical features. Journal of Endodontics 30(899-903.
Fan B, Cheung GS, Gutmann JL, Fan W (2004). C-shaped canal system in mandibular second molars: Part II Radiographic features. Journal of Endodontics 30(904-8.

This video can be watched in HD on Youtube. Please enjoy!

httpv://www.youtube.com/watch?v=dF3JUsY_k8I

Endodontic Microorganisms
Clinical Tips, Endodontic Preparation Techniques, Irrigation

1 Minute to Bacteria Free Canals. Here’s How.

Endodontic Microorganisms

Endodontic Microbes. Who needs them?

OK so a patient has come to see you complaining of toothache. It’s root canal time. You open up the lower right first molar and find a necrotic pulp. You’ve isolated well and done a nice endodontic preparation. Length is good and you’re happy with the sizes of your apical preps. You’ve been irrigating with plenty of sodium hypochlorite and used a final rinse of EDTA. Job done right?

Think again. In the vast majority of teeth, canals are not round, and as such there are going to be vast areas that are still harbouring debris and microbes. Just take a look at some of the microCT produced by Paque et al after preparation with rotary Ni Ti (Paque at al. 2010). It’s quite clear in these images that a good proportion of the original canal space remains untouched by our instruments.

So, hopefully, our irrigant is managing to get into these nooks and crannies? Well it will, but even after irrigation, there is still going to be significant debris from preparation (mushed up dentine, bacteria, necrotic pulp remnants) hiding away in fins, apical delta and especially in isthmuses.

I recommend you check out the work by Burleson and colleagues for some nice images on what can be left behind (Burleson et al. 2007). These guys conducted a randomised controlled trial (nice and high on the level of evidence) and compared preparation and irrigation alone, or with the addition of 1min of passive ultrasonic irrigation (PUI). They used the mesial roots of infected lower molars and then extracted the teeth to examine how much debris was left behind. Check out the table below to see the results on cleanliness of the canals at various levels from the apex. The isthmus especially is full of debris without PUI.

PUI Bacteria

Cleanliness of Canals at various levels from the apex. Pay special attention to the number in the isthmus.

Interesting right? It’s even better when you see the images in their article and realise just how much is being left behind when you only rely on irrigation.

I know what you’re thinking though. It’s bacteria that we’re concerned about, not debris. Well, Burleson’s colleagues thought of this, and conducted a separate study, I assume on the same teeth, using microbiological sampling to see what they could find (Carver et al. 2010). They concluded that PUI resulted in a significant reduction in colony forming units and positive cultures. In fact PUI was, “7 times more likely to yield a negative culture”.

So, it seems that PUI is something worth doing, and it’s certainly part of my routine. If you haven’t heard of it, I’ll explain what it is. PUI is simply the placement of an ultrasonically activated file into the canal filled with irrigant. There is some debate over how it works exactly, but acoustic streaming seems to be the key. This basically means moving the solution around so that fresh sodium hypochlorite gets into areas that needles won’t push it. The important point here is that the ultasonic file has to be loose in the canal. Touch the canal wall and acoustic streaming stops.

Personally, I use the Irrisafe from VDW because it’s easy. Just screw it on to your US unit and place it in the canal. The irrisafe is “smooth” i.e. it doesn’t have the sharp cutting edges that files do, so it is safer in the canal (Hence the name – smart huh). Here are my three keys to PUI:

1.     Use a low power setting as recommended by the manufacturer. You risk fracturing the ultrasonic file otherwise;

2.     Keep the file loose in the canal and don’t push it too deep;

3.     Replenish your sodium hypochlorite as you go.

Irrisafe

The Irrisafe. Attach it to your ultrasonic and kill more bugs.

Acoustic Streaming Endodontic

Acoustic Streaming in Action

I generally have my DA using a syringe to supply sodium hypochlorite and suction while I run the ultrasonic in the canals. If you don’t have a stand alone ultrasonic unit where you can easily control the power, then I wouldn’t risk using an ultrasonic file. You can achieve the same result by just holding a normal scalar tip against a size 10 stainless steel file. This is obviously much cheaper as well. Just be careful not to put the file too deep into the canal or you might actually damage the canal walls and ruin your nice preparation.

There are other methods for activating irrigant such as the Endoactivator and the Endovac. These work slightly differently. The Endoactivator is a sonic machine and has disposible polymer inserts. It seems very safe to me, but there isn’t much in the literature indicating that it is better at killing bugs than other methods (Huffaker at al. 2010), and it is not as effective as PUI at removing calcium hydroxide from canals (Wiseman et al. 2010).

Endodontic Endovac

This is just part of the Endovac system

The Endovac shows promise. It relies on a vacuum to remove irrigant that is being supplied by a needle deep in the canal. That means there is no positive pressure. One clinical trial showed that post-op pain was reduced after using the Endovac compared to needle irrigation (Gondim et al 2010). It is a bit of a contraption though and I have enough machines clogging up my surgery. I am waiting to see some studies comparing PUI directly to Endovac and Endoactivator before I give up my proven method of cleaning the canals.

Next time you finish a prep, grab your ultrasonic and give the canal a bit of a shake up. It’s impressive to see how much more debris you can get out when you irrigate again.

References:

BURLESON A, NUSSTEIN J, READER A, BECK M. 2007. The in vivo evaluation of hand/rotary/ultrasound instrumentation in necrotic, human mandibular molars. J Endod. 33: 782-787

GONDIM E, SETZER F, BERTELLI C, KIM S. 2010. Postoperative Pain after the Application of Two Different Irrigation Devices in a Prospective Randomized Clinical Trial. J Endod. 36:1295–1301

HUFFAKER S, SAFAVI K, SPANGBERG L, KAUFMAN B. 2010. Influence of a Passive Sonic Irrigation System on the Elimination of Bacteria from Root Canal Systems: A Clinical Study. J Endod. 36:1315–1318

PAQUE F, BALMER M, ATTIN T, PETERS OA. 2010. Preparation of oval-shaped root canals in mandibular molars using nickel-titanium rotary instruments: a micro-computed tomography study. J Endod. 36(4): 703-7

WISEMAN A, COX C, PARANJPE A, FLAKE N, COHENCA N, JOHNSON J. 2011.  Efficacy of Sonic and Ultrasonic Activation for Removal of Calcium Hydroxide from Mesial Canals. J Endod. 37:235– 238

Clinical Tips, General Updates

Whats New in LA @ the Trans Tasman Endodontic Conference

A Revolution in Dental LA Announced?

The Trans-Tasman Endodontic Conference was held in the beautiful New Zealand city of Christchurch on 4-6 November this year. It was great to catch up with good friends and see some interesting speakers. One of the headline acts was Dr Stanley Malamed, who is well known around the world for his books and lectures on emergency medicine in the dental surgery, local anaesthesia and sedation.

It was encouraging to hear Dr Malamed give support to many of the topics that were discussed in the previous blog post on how to prevent LA failure. He presented a lot of research supporting the increased efficacy of articaine when used in cases of acute pulpitis, especially when used as a buccal infiltration in addition to an inferior alveolar nerve block.

As with all conferences there are one or two things that catch your attention. One of those topics was presented by Dr Malamed and could be quite exciting if the research pans out as he expects. Essentially he was discussing a new way of accurately utilising a well known method of manipulating local anaesthetic to increase its efficacy. This could be a bit of a mini revelation in LA. Here is the theory:

LA is acidic. With adrenaline (epinephrine in US), a cartridge of LA is at about pH3.5. The lower the pH, the fewer molecules of the LA are in the active form which can penetrate the lipid membrane of the nerve and block the sodium gated channels. For lignocaine (lidocaine in US) with adrenaline at pH3.5, only 0.004% of the molecules are in the active form.

Raising the pH of the lignocaine to approximately 7.4 means that 24.03% of the local anesthetic ions are in the active form. This represents a 6000-fold increase. Buffering the LA solution by adding sodium bicarbonate just prior to injection can achieve this. The difficulty is in adding the correct amount of sodium bicarbonate to gain the correct effect. This is particularly difficult with cartridges such as those we use in dentistry.

Raising the pH also has benefits such as more comfortable injection (as the LA is not so acidic) and more rapid onset. Dr Malamed reported the results of a small preliminary study (double blinded randomized clinical trial in fact). Results were a significantly less painful injection with the buffered lignocaine and adrenaline, and an average onset time of 1 minute 26 for the buffered solution compared to 5 minutes 27 for the unbuffered solution.

This is exciting for all dentists! We need to see more studies on the efficacy of this buffered solution compared to other LA, especially articaine. But, anything that safely improves our ability to reliably anaesthetize teeth, especially those suffering from acute pulpitis is something worth watching in my book.

The product is called “Onset” I believe and should be available in 2011. It’s basically a machine that removes some of the LA from the cartridge and simultaneously injects an appropriate dose of sodium bicarbonate. Unfortunately it will only be available in the US initially, so the rest of us might have to wait a while. Hopefully this will give us time to see the results of further studies and assess whether the system works, and under what conditions.

The other invited speaker at the conference was Asgeir Sigurdsson. It was good to hear him talk also, especially since we’ve covered some topics that he has an interest in during previous podcasts. I’ll be updating you in what he had to say in a subsequent post.

Pathfiles
Clinical Tips, Endodontic Preparation Techniques

Faster, Easier, Safer Rotary Endo? Get Your Glide Path On.

Well, I don’t know if I’m going to help you improve the speed of your preparations, but I do want to make some comments about some files that I’ve recently had the opportunity to try (they may not be new to everyone, I work in China and things take a little longer to become available here). I’d like to make the point now that I’m not tied in any way to these files or the companies that sell them. In general, debates over what file system is best usually leave me a little bored and I’m not here to promote a particular brand or system. Everyone has their own favourite system and when you have experience with one type of file, then that is probably the one that will provide the best results for you. I also think it’s often quite difficult to take to a new file system as they all have a learning curve, a different feel within the canal and certainly different tolerances when it comes to fracture resistance.

Pathfiles

Thin files for narrow canals.

Anyway… The Pathfile NiTi files are only designed to prepare the glide path through the canal, and then you can use whatever system you prefer to complete the preparation. Want to know what I think is the key to quality rotary NiTi preparations? You guessed it, it’s the glide path. Most rotary Ni Ti files are designed to follow a path, not create one. It’s quite well accepted that if you can resist the temptation to pick up your initial NiTi file until your glide path is well and truly established, then you’ll find preparations are easier, smoother and probably faster. So, a rotary file system designed to create a glide path is a novel concept which challenges the assertion I just made.

There’s not much research around regarding these files other than an article that showed novice users could produce smoother glide paths in plastic blocks than endodontists can with stainless steel hand files. (Berutti et al, 2009) Sounds promising right? Well, I must admit to being a little hesitant when I first saw these files, because they are really narrow and well, you’re not creating a proper glide path before you put them in the canal. In my head, this meant susceptibility to breakage.

There are three files. A #13 (Purple), #16 (white) and #19 (yellow). The files are 2% taper, so they really are  quite narrow, but I guess that’s what makes them useful for preparing glide paths. The idea is to use a #10 stainless steel hand file to scout the canal (and confirm initial working length with EAL if possible), then use the #13, #16 and #19 to create the glide path. Working length is confirmed after this step. In practice, I found that they do a really good job of preparing the glide path, especially in narrow and curved canals e.g. MB2. The glide path that is produced is generally very smooth and makes the subsequent cleaning and shaping procedure easier and dare I say it faster. I don’t think you necessarily need to use all three files in all canals. Overall, you’re probably not going to prepare the canals any faster as you are now adding additional files to the process, and there is obviously going to be an increase in cost. But, if you are new to rotary NiTi, or looking to improve the consistency with which you can create a smooth tapered prep all the way to the apical foramen, then it might be worth giving these files a try. To be honest, these are the first products I’ve tried in some time that have had any sort of “wow” factor for me.

Using these files won’t be for everyone and more experienced practitioners probably have less need for them, but The Endospot is all about sharing information and helping others to improve their endodontics, so when I find something that I think might be worth discussing, then it will appear in your inbox. So, if you feel inclined to do so, get your friendly local rep (I think will be Dentsply in most places around the world) to drop a few samples off to you and grab some extracted teeth to get the feel of the file before diving into a live case. And remember to be gentle, these files are thin and going into narrow canals. If you do a search for Pathfile on youtube, you’ll find a couple of videos worth watching as well. If any readers have experience with these files and want to contribute some tips, then please leave a comment below.

References:

BERUTTI E, CANTATORE G, CASTELUCCI A, CHIANDUSSI G, PERA F, MIGLIARETTI G, PASQUALINI D. 2009. Use of nickel-titanium rotary pathfile to create the glide path: comparison with manual pre-flaring in simulated root canals. J Endod, 35, 408-412

Clinical Tips, Endodontic LA, General Updates

The Endospot Episode 1 | Preventing Local Anesthetic Failure in Endodontics

Problems with Local Anaesthesia?

In this, post, we discuss practical techniques for preventing failure of LA for endodontics, especially when dealing with irreversible pulpitis. Listren to the audio file below:

Preventing Local Anesthetic Failure in Endodontics

For the new and updated podcast, go to the podcast page.

References referred to in this podcast:

Meta Analyisis on Artciaine V lidocaine:
KATYAL V. 2010. The efficacy and safety of articaine versus lignocaine in dental treatments: A meta-analysis.  J dent: 38: 307-317

Intraossesous Injections:
READER A, NUSSTEIN J. 2002. Local anesthesia for endodontic pain. Endodontic Topics: 3: 14–30

Use of Articaine for buccal infiltration:
MATTHEWS R, DRUM M, READER A, NUSSTEIN J, BECK M. 2009. Articaine for Supplemental Buccal Mandibular Infiltration Anesthesia in Patients with Irreversible Pulpitis When the Inferior Alveolar Nerve Block Fails. J Endod: 35(3): 343-346
AGGARWAL V, JAIN A, KABI D. 2009. Anesthetic Efficacy of Supplemental Buccal and Lingual Infiltrations of Articaine and Lidocaine after an Inferior Alveolar Nerve Block in Patients with Irreversible Pulpitis. J Endod: 35(7). 925-929

PSA Block Link –
Information on the PSA Nerve: http://en.wikipedia.org/wiki/Posterior_superior_alveolar_nerve
Video: You Tube Video on the PSA Nerve Block

Show Transcript:
Welcome to the Endospot Episode 1.
In today’s podcast I’ll be discussing my techniques for managing local anaesthetic failure and specifically how to manage teeth diagnosed with irreversible pulpitis.

On the site we have references and show notes for this episode, so head to www.endospot.com and remember you can sign up and receive the Endospot blog posts directly into your inbox.

So let’s get on with the podcast.

On the topic of failed LA, it’s important to recognise situations where complete anaesthesia is likely to be difficult to obtain. In general terms, the mandibular molar teeth are the most difficult to anaesthetise, and this is where you’re likely suffer the most failures.
The issue with mandibular molar teeth is compounded where we have an irreversible pulpitis. The inflamed pulp is always going to more difficult to anaesthetise. You’ll often have a slightly distressed patient in this situation, so it’s important to get it as right the first time. Once you’ve begun treatment on an anxious patient and they’ve suffered a level of pain due to failed LA, it can be quite difficult to win back their faith in you.

Now it’s certainly my experience that where the pulpitis has been long standing and is becoming more and more acute, this will be the most difficult tooth to get numb. A good example might be a case of cracked tooth syndrome where the tooth has been manageably painful to bite for months, but is now becoming more and more sensitive to thermal stimuli and spontaneous pain has begun to occur. I suggest you hit these ones with every trick in the book.

Abscessed teeth don’t normally represent a huge problem for anaesthesia in terms of being able to instrument the canals, but sometimes the surrounding tissues will be difficult to anesthetise and the patient will still respond to things like pressure. One caveat here though. Just because you’ve made a diagnosis of abscess, don’t assume that there is no vital tissue in the canal. Some vital tissue can remain in the canal even in the presence of pus and swelling, and attempting to debride this canal can result in high levels of pain. So, I always assume the worst when dealing with patients in pain and provide complete anaesthesia

In my previous last post, I covered the reasons for LA failure in pulpitis cases, so if you want more details and references, go to the blog post at endospot.com and review those there. The main points that are worth considering though, are that a numb lip after IANB does not necessarily equal pulpal anaesthesia. This is the case even when dealing with an uninflamed pulp, but is especially so where you are dealing with an inflamed pulp. Research generally tells us that if we are dealing with an irreversible pulpitis and we give an IAN block which is apparently successful as the patient’s lip is numb, then , we’ll still only be successful in completely anaesthetising the tooth nerve about 55% of the time. Now, that’s obviously unacceptable, so we’re going to need to use supplementary LA for these cases.

The second point to note is that LA takes time to work. Again, research tells us that in 19-27% of cases, complete anaesthesia doesn’t occur until 15 minutes after the injection. So, next time your LA fails, it may simply be that the LA hasn’t had time to work. Supplemental techniques such as the PDL and intraosseous injection tend to work much faster than IADB, and should have you removing that inflamed pulp much faster.

As to which type of LA you should use, this will to a certain extent come down to personal preference, and obviously the medical profile of the patient. In general terms though, I would recommend using articaine. There’s been plenty of research in recent years devoted to articaine with some conflicting results. But, a recent meta-analysis concluded that articaine was more effective than lidocaine for anaesthetising mandibular molars. The article is by an Australian and so refers to lignocaine, but I assure you it’s the same drug.
So now I’ll go through my standard technique for dealing with hot pulps. Wherever not contraindicated, I’ll prescribe ibuprofen as soon as possible prior to treatment. There is some evidence that this alone may assist in achieving complete anaesthesia in inflamed pulps, but even if it doesn’t let’s remember that  these patients are presenting with pain, and therefore are at risk for post-operative pain. In this case, Ibuprofen (unless contraindicated) would be part of my pain management regime anyway.

When faced with a hot mandibular molar, I’ll start with a regular IAN Block and follow this with a buccal and lingual infiltration. The buccal infiltration ensures that a rubber dam clamp can be placed comfortably, but more importantly, I think that combining the block of the nerve with the local infiltration simply means that we have two sites along the nerve trunk that are blocked and this will lead to improved anaesthesia. This makes a lot of sense to me and is backed up by a number of studies which show that in cases of irreversible pulpitis, the infiltration significantly improves success rates. These studies have also shown the improved effect of articaine over lidocaine for this purpose.

After the buccal and lingual infiltrations, we take a minute’s break to ensure they are active and then move onto the PDL injection. There are a number of specialised equipment kits for PDL injections available, but they can be done successfully with a standard syringe. The first step is to bend the needle with some haemostats so that you are able to place pressure on the needle as it is forced into the PDL. The needle is inserted into the gingival crevice and with the bevel facing away from the root surface. Press hard and inject for 10s. There should be back pressure, if there isn’t, then the solutions wont’ be forced through the cribriform plate into the cancellous space and won’t be effective. I’ll perform the PDL injection at the four corners of the tooth.

The PDL injection is not really a PDL injection. I mentioned that the solution is forced into the cancellous space and as such It’s really an intraosseous injection. Therefore, there may be cardiovascular effects and this should be taken into account when selecting the LA. If an adrenaline containing LA is contraindicated, then you can use a non-adrenaline containing LA for this purpose.

The rate of onset of a PDL injection is fast, but the duration is short compared to IAN block, so at this point I’ll get a rubber dam on to the tooth and start access almost immediately. Once the pulp space is penetrated, and if vital tissue is found, then I’ll perform an intrapulpal injection. This injection relies on backpressure, so can only be used if only a small perforation is made into the pulp chamber.
For maxillary molars, I’ll start with a buccal and palatal infiltration, injecting most of the cartridge bucally. The palatal injection allows the rubber dam clamp to be placed comfortably, but might also anaesthetise the palatal root where a buccal infiltration could fail. After this, I perform a posterior superior alveolar block. I’ve placed a link in the show notes so you can have a look at this technique if you’re not familiar with it. I think that in the same way that the buccal infiltration in the mandible works with the IAN block to improve anaesthesia by blocking two points along the nerve trunk, combining a SPAN block with infiltrations should do the same. I then move onto PDL injections and perform an intrapulpal once the pulp chamber is entered.

The vast majority of cases, these procedures will allow you to enter the pulp space and remove most of the inflamed pulp tissue. If you are unable to even enter the pulp space, then your only real option is to perform an intraosseous injection. This does require specialised equipment. A good review of this technique can be found in the endodontic topics article referred to in the show notes. If you are comfortable with intraosseous injections, then these can be substituted for the PDL injections in the standard routine. My practical experience though is that if you follow the techniques described you really should have a very high level of success.

One point to note though is that infiltrations and PDL injections won’t make up for a failed IANB, so if there is any doubt that the block has been successful, then it’s worth repeating the block. If you want to be certain, it might make sense for you to perform the block and then wait until there are significant signs of lip and tongue anaesthesia before going onto the infiltrations and PDL injections. Obviously these injections can cause lip numbness also and so can mask a failed IAN block.

After entering the pulp chamber, you may find that you can remove some or most of the pulp tissue but attempting to pass a file to length in the canal elicits pain. In this case, I don’t see any reason to persist as the process of removing the bulk of the pulp tissue will result in resolution of the patient’s symptoms. I’ll dress the tooth with a corticosteroid containing dressing such as ledermix or odontopaste and send the patient home with assurances that the symptoms will resolve and the tooth will be easier to treat at the subsequent visit as the inflammation in the pulp will have resolved greatly. If you persist when complete anaesthesia isn’t achieved, you’re likely to put your patient and yourself through a lot of unnecessary pain, and the patient will be sure to be more anxious and will probably be one of those people that for the rest of their life tells their friends how agonising root canal treatment is.

So that is my routine for dealing with hot pulps. I’m aware there will be many different techniques out there and I’d love to hear some feedback. For those listeners who are just beginning their career, I’d recommend getting into the habit of using block and infiltration anaesthesia for all endodontic cases, and adding the PDL and intrapulpal injections when required.