Failed Anaesthesia
Clinical Tips, Endodontic LA, General Updates

The Endospot Guide to Understanding Local Anesthetic Failure


Failed Anaesthesia

The patient with a hot pulp spells trouble when it come to anaesthesia

Every dentist has had the unfortunate experience of being unable to achieve anesthesia, especially when dealing with an irreversibly inflamed dental pulp. You find yourself filled with self-doubt and feeling helpless, especially where the patient has presented in pain and you feel you need to remove that inflamed pulp!

But, LA failure is a bit more complex than I think most of us realise. Most of the information that follows is taken from an excellent review of the topic by Ken Hargreaves & Karl Keiser, so grab that if you want in depth analysis (Hargreaves et al. 2002). I’m going to cover what I think is important for most of us.


There are a number of reasons for LA Failure, but the first thing I think we should consider is this:
1.    Complete pulpal anesthesia is not achieved 100% of the time in normal pulps;
2.    Complete pulpal anesthesia has a slower onset than most of us would expect .

The simple fact is that a well administered inferior alveolar nerve block does not provide complete pulpal anesthesia 100% of the time. Bou Dagher conducted IAN block on 30 subjects and achieved 100 numbness of the lip, but only 50-75% of these patients demonstrated complete molar anesthesia when measured by electric pulp tester (Bou Dagher 1997). For most dentists, the majority of LA is given for restorative procedures, and often, anesthesia may be sufficient to prepare a cavity for restoration without problem. I think this probably lulls us into a false sense of security as to how successful our techniques are.

The next point to make is that the onset of complete pulpal Anesthesia takes time, most commonly up to 15 minutes. It’s fair to say that we would often not wait that long before attempting a procedure. In studies, onset was longer than 15 minutes in 19-27% of cases and longer than 30 minutes in 8% of cases. Complete lip numbness occurred much faster, within 5-7 minutes.
On this topic, It has been shown that injecting a second cartridge of LA injected after an apparently successful IAN block does not improve the onset time (Vreeland et al. 1989). In those situations where we have an apparently failed IAN block (despite profound lip numbness), and we inject a second cartridge and we then achieve anesthesia, it’s probably just that we’ve allowed more time for the initial injection to work.

The key points here are:
1.    Lip numbness does not confirm pulpal anesthesia;
2.    Onset takes time
3.    IAN blocks are unreliable when it comes to achieving pulpal anesthesia even in uninflamed pulps

What happens when we have an inflamed pulp? Things are even more dire. Two studies that evaluated pulpal anesthesia after IAN where the pulp was inflamed reported an average of only 55%, despite 100% numbness of the lip (Cohen et al. 1993, Nusstein et al. 1998).
Theories on failure of LA

It is my recollection from reading textbooks at dental school that IAN blocks failed because of the increased pH in the region of an inflamed pulp which prevented dissociation from the acid form of the LA to the base form. The base form was then unable to diffuse across the cell membrane in order to block the sodium channel. This never sat well with me because I couldn’t understand why inflammation at the site of a lower canine tooth would affect the dissociation of an LA molecule deposited near the mandibular foramen.  The truth is that while this theory remains a possibility, it is unlikely that this is a real explanation for the failure of LA. Firstly, the change in pH in inflamed tissues is not large, and inflamed tissues possess a greater buffering ability than normal tissues. Secondly, any change in tissue pH is also likely to be very localised (Punnia-Moorthy, 1988).  So, given our clinical results of reduced anesthesia of mandibular teeth after IAN blocks, we can consider this explanation to have some, but probably limited clinical relevance.

The second reason I recall from dental school for failure of IAN blocks was accessory innervation from the myelohyoid nerve. The lingual, buccal and transverse cervical nerve have also been implicated, however there is limited evidence for these mechanisms. Potentially, however, they could contribute to LA failure.

A third possible method mentioned in the literature is resistance or tachyphylaxis. According to Kenneth Hargreaves (who by the way is an extraordinary speaker and you should make an effort to see him speak) there is little evidence for this, and I think we should be happy to take his word for it.

The next possible mechanism of failure of LA is through the increased blood flow that occurs in inflamed tissues. This could potentially result in increased removal of LA from a site. Again, this is likely to be a localised issue and should not affect regional block anesthesia. Theoretically, increasing the concentration of vasoconstrictor in LA should counteract this mode of failure, but to date there have been few studies (I couldn’t find any) comparing different concentrations of adrenaline in pulpitis cases. In normal pulps, the results have been a little contradictory with some studies showing equivalent results for different concentrations of adrenaline (Epinephrine). One study however has shown a dose dependant effect on onset and duration of infiltration anesthesia with 2% lidocaine and 1:200000, 1:100000 and 1:50000 adrenaline.

OK, now we get into the important stuff – the real reasons why we have trouble convincing inflamed pulps to be quite while we operate on them. In the presence of inflammation, a number of changes occur to the actual nociceptors, or pain receptors. The receptors become both activated and sensitized. For example, when bradykinin is released, this will cause the neuron to fire, causing pain.
Sensitization of nociceptors occurs due to other inflammatory mediators, such as prostaglandin E2 (PGE2).  This results in the threshold for the nerve firing reducing. The result is that the nociceptors will activate with a much milder stimulus. It has been shown that both activation and sensitization result in a level of resistance to anesthetics (Rood et al. 1981).

Another thing that occurs in response to inflammation that might surprise you is nerve sprouting. Inflammatory mediators actually cause nerves to grow into the inflamed are and this has been shown to happen in human dental pulp (Byers et al. 1999). This simply means there are far more nociceptors to block and results in an increased receptive field. Check out work by Byers for some great microscope images showing the vast increase in nociceptors in inflamed rat pulps.

Inflammation also causes an increase in the production of proteins by nociceptors, such as substance P and calcitonin gene related peptide. These proteins play a role in the regulation of inflammation in the pulp, and may have some role to play in LA failure.
Another interesting concept relates to a specific type of sodium channel on neurons which is resistant to tetrodotoxin (TTX), funnily enough called the TTX-resistant sodium channel. These channels are less sensitive to lidocaine, about one quarter as sensitive as normal sodium channels and are present on human pulp nociceptors under normal conditions. Expose a nerve to PGE2, and their activity doubles (gold et al. 1996).  Therefore, this represents a mechanism whereby LA could fail. My thoughts are that the prostaglandin might only operate on these channels locally, and this theory might suffer from the same argument as the pH change theory, that is that it might only occur locally, so shouldn’t necessarily effect block anesthesia.

Central Nervous System (CNS) Sensitization may contribute to LA failure. When inflammation and pain occur for an extended period of time, this results in an increased excitability of the CNS. In basic terms this means that a lesser stimulus will result in a higher level of pain being experienced. Central sensitization is a blog post all by itself and as an endodontists, we are particularly careful of pain control in any patient who presents with a history of chronic pain. Hargreaves feels that the excited CNS may be responsible for otherwise innocuous stimulus presenting as anesthetic failure. For example, we may treat a patient who feels some minor discomfort but tolerates it for the procedure. In a patient who has been subject to central sensitisation, the discomfort may present as pain.

So there you go, and I hope this makes you feel a bit better the next time you can’t anaesthetize a “hot” pulp. It’s probably a bit more complicated than you previously thought, and it’s probably a bit less your fault than you previously felt. I’ll be discussing my methods for dealing with LA failure and inflamed pulps in a separate blog post.

BYERS MR, NARHI MVO. 1999. Dental injury models: Experimental tools for understanding neuro-inflammatory interactions and polymodal nociceptor functions. Crit Rev Oral Biol
Medical . 104–139.

BOU DAGHER F, YARED G, MACHTOU P. 1997. An evaluation of 2% lidocaine with different concentrations of epinephrine for inferior alveolar nerve block. J Endod. 23: 178–180.

COHEN HP, CHA BY, SPANGBERG LS. 1993. Endodontic anesthesia in mandibular molars: a clinical study. J Endod. 19: 370–373.
GOLD M, REICHLING D, SHUSTER M, LEVINE JD. 1996. Hyperalgesic agents increase a tetrodotoxin-resistant Na¹ current in nociceptors. Proc Nat Acad Sci: 93: 1108.

KENNETH M. HARGREAVES & KARL KEISER. 2002. Local anesthetic failure in endodontics:
Mechanisms and Management. Endodontic Topics 2002, 1, 26–39

KNOLL-KOHLER E, FORTSCH G. 1992. Pulpal anesthesia dependent on epinephrine dose in 2% lidocaine. Oral Surg Oral Med Oral Pathol. 73: 537–540.

NUSSTEIN J, READER A, NIST R, BECK M, MEYERS WJ. 1998. Anesthetic efficacy of the supplemental intraosseous injection of 2% lidocaine with 1: 100,000 epinephrine in irreversible pulpitis. J Endod. 24: 487–491.

PUNNIA-MOORTHY A. 1988. Buffering capacity of normal and inflamed tissues following the injection of local anesthetic solutions. Br J Anaesth. 6: 154–159.

ROOD JP, PATEROMICHELAKIS S. 1981. Inflammation and peripheral nerve sensitisation. Br J Oral Surg 19: 67–72.

VREELAND D, READER A, BECK M, MEYERS W, WEAVER J .1989. An evaluation of volumes and concentrations of lidocaine in human inferior alveolar nerve block. J Endod 1989: 15: 6–
12.

Clinical Tips, Endodontic Preparation Techniques, Endodontic Re-treatment

How to Simply Remove GP for Endodontic Retreatment

Endodontic retreatment, remove GP

How are you going to remove the GP from this tooth?

Below is a video of a demonstration I gave at the Jiao Tong University Dental School in Shanghai. I was demonstrating a method for removal of GP from treated canals. The method that I describe is only one of many methods, but I think it is a good way to begin re-treating. Please watch the video and share your thoughts:

httpv://www.youtube.com/watch?v=D5SeDNOusV4

Clinical Tips, Endodontic Radiography

How to Improve Your Endodontics in 30 Seconds Flat

Endodontic radiography

Same Tooth, Very Different Images. Taking an Additional Radiograph Provides A Whole Lot More Information

A simple way to improve your endodontics is to simply take two radiographs where you might previously take one. I routinely take two radiographs with differing horizontal angulations when treating potentially multi-rooted teeth (basically everything apart from maxillary incisors) unless there is a reason not to. When dealing with root canal anatomy we’re dealing with a very three dimensional issue, yet a lot of what we plan and assess our treatment on is two dimensionally based. There are so many reasons to take additional views, and in the long run it can make your life easier and improve your endodontics.

The process of taking an additional radiograph adds 30 seconds or less to the radiograph time. You already have the rubber dam folded back and the x-ray tube in place. Developing two radiographs instead of one does not take any longer (especially with digital). More importantly though, you simply have far more information to work with. Additional canals that might not be visible on a standard radiograph will often be visible on a mesial tube shifted radiograph. Where roots that lie close together have differing lengths, this may not be obvious with a radiograph that superimposes the two roots.  Similarly, two radiographs will allow you to determine more accurately which root a lesion is associated with.

Taking an additional radiograph when measuring working lengths is essential, as often files will superimpose on a radiograph and thus, the information on where the file ends relative to the root tip can be lost. This applies for obturation radiographs also.

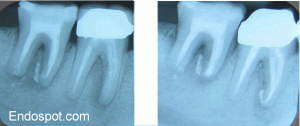
The image on the right appears to show one distal canal, but the mesial tube shift reveals two separate canals.

The image on the right appears to show one distal canal, but the mesial tube shift reveals two separate canals.

Let’s not also forget that occasionally, we may take a radiograph that is not of diagnostic value. For example when the apex of the tooth in question has been missed on the radiograph. The second radiograph may have sufficient information to save you having to re-take the radiographs.

The negative aspect of additional radiographs is the increased radiation exposure for the patient. Obviously, it is important to weigh up the benefits versus risks of taking the additional radiograph, and in my opinion, the potential to improve the endodontic outcome makes the taking of these radiographs imperative.

I was recently sent an x-ray by a referrer who had root filled a vital upper pre-molar, however the patient complained of ongoing discomfort associated with the tooth. The radiograph showed a well condensed root filling that appeared slightly off centre from the middle of the canal. I advised taking a mesial shift of the tooth and the presence of a second canal was obvious. After treatment of the missed palatal canal, the tooth was asymptomatic and ready for restoration. It would have saved quite some trouble, as well as time had the mesial tube shift radiograph been taken prior to, and during treatment.

Untreated Canal

This tooth remained symptomatic after treatment. Note the obturated canal appears slightly off-centre.

Untreated Palatal Canal

A radiograph taken with a mesial tube shift clearly shows a palatal canal which has not been prepared or filled.

Resolution of symptoms

Upon cleaning and shaping of the palatal canal, the symptoms resolved.

I’d love to hear reader’s thoughts on this topic, or case examples where tube shift radiographs have assisted to improve the quality of endodontic treatment. Please leave a comment with your thoughts.

Clinical Tips, Endodontic Surgery, Study Guides

How to Manage Persistant Endodontic Disease Without Apical Surgery (Now With Three Year Follow-up)

Intentional Reimplantation

Despite Endodontic Re-Treatment The Second Molar Was Associated with a Sinus Tract. Resorption of the Distal Root Apex Can be Seen.

Intentional Reimplantation involves carefully extracting a tooth, performing root end resection and retro fill, and reimplanting the tooth. It is a simple and reliable procedure which can be performed by any dentist and can be used to retain teeth that might otherwise be deemed hopeless. See the Endospot Study Guide to Intentional Reimplantation at the end of this post for references and a full list of indications/contraindications etc.

In situations where endodontic procedures have failed or cannot be undertaken, endodontic surgery is a commonly used treatment modality. There are, however, situations where traditional endodontic surgery is difficult, or inappropriate.  In particular, this occurs where anatomy such as a thick bony plate limits access (especially in the lower 2nd/3rd pre-molar), or vital structures such as neurovascular bundles are at risk (especially the mental n. in the region of the lower 1st/2nd molar). This also occurs due to other factors such as accessibility, lack of patient cooperation or a preference not to undertake surgical procedures.

In these cases, intentional reimplantation (IR) may provide an option to treat persistent apical disease. In certain cases, IR is the preferred option over surgery. IR is not a last hope procedure. When done according to protocol it is very predictable. The procedure itself is something that many dentists may find confronting, but in reality it is not difficult to do, and most dentists can have it in their repertoire.

I’ve mentioned that IR is not a last hope procedure, but in any event, when you have run out of options, and a tooth is to be extracted, then it may be worth considering treating and replanting the tooth.

The two main contraindications to IR are flared or curved roots and periodontal involvement.  The first is an obvious contraindication, because the tooth needs to be able to be extracted in a controlled manner. One key factor for success is to limit the damage to the cementum layer of the toot. If the cementum layer or PDL is damaged, then there is a greater potential for resorption to occur. The second is obvious as well, because an unhealthy periodontium will complicate the healing process.  Once again, see the study for a full list.

When I discuss this procedure with dentists, they are often concerned about the potential for resorptive processes and ankylosis. Most of this concern comes from experience with teeth that have been avulsed. IR is a completely different situation to a traumatic avulsion. You could reasonably expect far more trauma to the cementum and bone during a traumatic avulsion, but probably more importantly is that the tooth is often left , contaminated, dry and out of the socket for an extended period. This leads to necrosis of the PDL, and ankylosis ensues. With IR, the tooth is very carefully extracted and maintained out of the mouth in a moist environment for a very limited time. These conditions are ideal to allow healing.

A classic case is the lower second molar which has been treated endodontically and shows signs of persistent disease. In the case below, the patient was referred for management of persistent disease in the first molar. The lower right second molar has been re-treated by and endodontist 3 months prior to the patient being referred to me. Unfortunately, there was a sinus tract present, associated with the distal root of the 2nd molar (determined by taking a radiograph with a #30 GP point in the tract).

Intentional reimplantation sinus tract

#30 GP Point Inserted into The Sinus Tract Traces to the Distal Root

I spoke to the treating endodontist who told me that the distal root had an open apex, and he had filled the distal canal with MTA. In this case, access and a large amount of bone overlying the root of the 2nd molar make surgery untenable. Even many experienced endodontists will tell you they have never performed traditional apical surgery on a lower second molar. After discussion with the patient, we decided to perform a reimplantation.

The tooth was periodontally sound, and exhibited normal mobility. It was not tender to percussion or palpation. Radiographic examination revealed a lucency associated with both roots, lucency in the furcation region and extruded material associated with both roots. Prior to extraction, the tooth is taken out of occlusion. When the tooth is repositioned, swelling may result in the tooth slightly extruding from the socket, so it is important to ensure there is good clearance from opposing teeth. Pre- & post-operative broad spectrum antibiotics such as amoxycillin are given. Chlorhexidine mouthrinse three times daily is initiated one day prior to the procedure and continued for one week after.

LA is given and the tooth carefully extracted. By this I mean that very gentle force is utilised. The tooth is grasped with forceps only by the crown. The root surface is not touched, so as to avoid damaging the cementum layer. It is common to spend 15 or 20 minutes extracting a tooth that might otherwise be extracted very rapidly. Obviously, the use of luxators and elevators is avoided.

Once extracted, I place a rubber band around the handles of the forceps to prevent the tooth being dropped. It’s important to keep the PDL moist, so have plenty of solution available and keep your assistant active in syringing solution over the PDL. A physiological solution is used. There is evidence that solutions such as hartman’s solution provide better stability of the PDL cells, but saline can also be used (a solution used in the transport of organs for transplant has been shown to by the best at maintaining viability of PDL cells, but this may be impractical).

The apicectomy is then performed using a high speed bur with copious water coolant. I know that water is not the best thing to be applying to PDL, but I think it’s more important to have coolant that to allow uncontrolled heat to be applied to the root. In general aim to remove 3mm of root tip. This should remove most of the accessory canals that may be harbouring microorganisms.

The next step is to use a small round bur to complete the retropreparation. There is no trick to this. Simply create a preparation in the root canal space 3-4mm deep. Any isthmus which is present between canals should also be prepared. This will especially occur in the mesial root of the lower molar. This preparation is designed to remove any infected GP and dentine and allow a retrofill to be placed which will seal in any remaining microorganisms or their products. Inspect the root surface for lateral canals and fill these in the same manner. In this case, the distal canal had been filled with MTA. MTA seals extremely well (compared to GP, which does allow micororganisms to pass) so there was no need to place a retrofill in the distal root.

Reimplantation Endodontics

The retropreparation has been completed in the mesial root. The distal root is filled with MTA so no retrofill is required.

There are many suitable materials for retro filling. The two most popular with endodontists are MTA and Super EBA. These materials have shown a good ability to seal and MTA in particular is highly biocompatible. MTA can be diifcult to handle, so make sure you have practised mixing and handling it first if you plan to use this. If these materials are not available, then IRM may be used. In the past amalgam has been used for retrofilling, but this material tends to corode over time, leading to loss of seal. When placing the retro fill, pack the material into the cavity with a small amalgam plugger, and then burnish.

The next step is to carefully debride the pathological tissue from the tooth socket. Here, it is important to try to avoid disturbing the PDL. By debriding, you are also removing the blood clot which may have formed in the socket. Irrigate the socket thoroughly and reposition the tooth with gentle pressure. It helps to have the patient bite gently on a wooden spatula to help ensure the tooth is correctly positioned into the socket.

Generally, no splinting will be required and a suture is placed over the tooth to hold it in position. Splinting is not desired as it impedes cleaning the area, and may lead to higher rates of resorption. If the tooth is excessively mobile after replantation, then consider splinting for a short period (3-4 days). Again, I’m aware that guidelines for traumatically avulsed teeth advise splinting, but a replanted lower molar has much greater primary stability than a replanted central or lateral incisor which was knocked from the mouth, and years of experience by endodontists conducting this procedure show that splinting is rarely required.

A radiograph is taken immediately after replantation to help confirm that the tooth is repositioned and as a baseline for healing. The sutures can be removed after 3 days and occlusion checked again. At this point some physiological movement due to occlusion is fine, but make sure the tooth is not high in occlusion. Most patients report very little discomfort after the procedure. Oral hygiene is important and flossing and brushing should resume as soon as the patient is comfortable.

The post-operative radiograph revealed I had failed to remove the extruded sealer which was associated with the mesial root. This was probably a result of careful debridement of the socket. The decision was made to leave this in place as re-extracting the tooth was likely to case more damage than benefit.

Review of the case mentioned above at 2 weeks revealed the tooth to be quite mobile. This is not unusual, as is not a cause for concern as the tooth will generally become less mobile. Importantly, periodontal examination was within normal limits. indicating that reattachment of the PDL had been successful. The sinus tract had healed. Examination at three months revealed no sinus tract, nil tenderness to percussion nor palpation, normal periodontal examination and normal mobility. Radiographic examination revealed excellent healing of the periapical areas. There continued to be lucency in the furcation area. This tooth will be monitored and I’ll update the post accordingly.

Reimplantation healing

Pre-op and 3 Month Review Radiographs. Excellent, But Incomplete Healing of the PA Lesions are Apparent. Prognosis is Excellent. The First Molar Has Been Re-treated and Initial Healing of The PA Lesions is Also Apparent.

Six Month Review of Intentional Reimplantation

Six month review shows osseous healing adjacent to the root ends of the second molar. The tooth is functional, periodontally sound and mobility is normal. Coronal restoration should now proceed. The lesion on the mesial root of the first molar has also continued to heal but a lucency remains around the extruded sealer.

Update on this patient:

A three year review has now been undertaken. The tooth is asymptomatic, periodontal probing and mobility is normal. At this stage there appears to be no sign of ankylosis. The PA shows excellent resolution of the apical lucencies.

Reimplantation

Occlusal view of restored first and second molar.

intentional reimplantation

Side view. The tooth is healthy with no sign of return of the sinus tract and in function.

The three year review PA shows good healing of the apical lucencies. This simple and inexpensive treatment has allowed this patient to keep their tooth in function in the short term. I will keep recalling the patient.

The three year review PA shows good healing of the apical lucency. The lucency associated with the mesial root of the first molar has also resolved. This simple and inexpensive treatment has allowed this patient to keep their tooth in function in the short term. I will keep recalling the patient.

Lets Hear Your Thoughts:

I’d like to hear from others on your technique and experiences with IR. Feel free to send through cases and I’ll add them to this post.

References

Bender IB, Rossman LE (1993). Intentional replantation of endodontically treated teeth. Oral Surgery, Oral Medicine, Oral Pathology 76(5):623-630

Peer M (2004) Intentional replantation – A last resort treatment or a conventional treatment procedure? Nine case reports. Dental Traumatology 20:48-55

The EndoSpot Study Guide on Intentional Reimplantation:

The best known reference for IR is Bender IB, Rossman LE (1993). Intentional replantation of endodontically treated teeth. Oral Surgery, Oral Medicine, Oral Pathology 76(5):623-630. In a retrospective case series they followed 31 cases for  1 day to 22 years and reported an overall success rate of 80%.

Another good overview is provided by Peer, however this is a simple case series. Criteria for success/failure is not listed and no rates of success are given: Peer M (2004) Intentional replantation – A last resort treatment or a conventional treatment procedure? Nine case reports. Dental Traumatology 20:48-55

Primary Indications for IR are listed as:

  1. Teeth have been treated unsuccessfully by conventional means (surgical/non-surgical)
  2. Separated instruments cannot be bypassed or removed
  3. Post/crown restoration requires retreatment
  4. Apical surgery would remove enough bone to cause a periodontal pocket
  5. Apical surgery would result in nerve injury or perforation of the maxillary sinus

Secondary Indications:

  1. To gain access to perforations on the mesial/distal or lingual root surface (esp inraradicularly)
  2. To treat grossly overfilled conventional root fillings and teeth with blunderbuss apices
  3. To enable inspection of a root for fracture
  4. When the patient will not accept apical surgery
  5. When the wrong tooth is extracted or accidental avulsion of a tooth during the removal of crown in a prosthetic procedure;
  6. Cases involving a deciduous tooth to allow it to act as a space maintainer

Contraindications for IR are:

  1. Presence of periodontal disease in which there is marked tooth mobility, furcation involvement or gingival inflammation
  2. Flared or curved roots
  3. Fractured Roots
  4. Patients are taking bisphosphonates

Advantages:

  1. Less invasive than apical surgery
  2. Simpler, and less equipment required c.f. apical surgery
  3. Improved access for inspection and resection/retropreparation
  4. Less soft tissue scarring

Disadvantages:

  1. Potential for root resorption
  2. Reduced access to apical pathology
Clinical Tips, Endodontic Re-treatment

The Secret to Removing Silver Points

Silver points are still available today for obturation of root canals, but their users are becoming fewer and fewer. This is fortunate, as they are obviously a poor choice of material to fulfill our aim of hermetically sealing the root canal system. These points corrode over time and allow high levels of leakage. If you’re particularly interested in the mode of failure, check out the following references:

Seltzer S, Green DB, Weiner N, DeRenzis F.
A scanning electron microscope examination of silver cones removed from endodontically treated teeth.
Oral Surg Oral Med Oral Pathol 1972;33:587–605.

Zielke DR, Brady JM, del Rio CE.
Corrosion of silver cones in bone: a scanning electron microscope and microprobe analysis.
J Endod 1975;1:356–60.

Goldberg F.
Relation between corroded silver points and endodontic failures.
J Endod 1981;7:224–7.

Zmener O, Dominquez FV.
Corrosion of silver cones in the subcutaneous connective tissue of the rat: a preliminary scanning
electron microscope, electron microprobe, and histological study.
J Endod 1985;11:55–61.

Silver points for root canal obturation, however have been used extensively in the past, and this means that we will be required to remove them for the purposes of re-treatment. Many younger dentists will never have been introduced to the silver point technique, and may never have even handled one.

The main thing to note is that the silver point is quite soft and malleable. It is also smooth, which means that it does not generally bind in the canal. The points were cemented into the canals with sealer, and generally, the point was left protruding into the canal and the core material placed around it. Thus, If you can manage to retain this free end and grasp it, it can often be pulled free of the canal, especially if there has been extensive microleakage. Where a point has been sheared off at or below the level of the orifice, it can be much more difficult to remove.

The first step in removing a silver point is to carefully remove any core material from around the point. The softness of the point does, however mean that caution must be used when exposing the free end of the point. both burs and ultrasonics can quite easily cut through through the point leaving you little to grab on to. So, I generally use an ultrasonic instrument to remove the core material. If the core material is harder – composite or amalgam and you don’t have specialised endodontic ultrasonic points, then take great care when removing the core material with burs so as to ensure you don’t cut through the silver point.

Don’t worry if you don’t have specialised endodontic ultrasonics available, you can work with your general purpose ultrasonic tip, as long as you carefully remove much of the core material and then use the ultrasonic to free the silver point tags.

Once you have removed the core material, irrigate thoroughly with sodium hypochlorite. The next step is to try to free up the coronal portion of the silver point. A few drops of chloroform will help to dissolve some sealer if the sealer is ZOE based. You can then gently use a small file to try to break up the cement around the coronal portion of the point.

If the point appears to be a little loose, it’s time to start pulling. At this point, you might find that you have nothing small enough to reach into the pulp chamber to grab the free end of the point. Unfortunately, this is where you might find that some specialised equipment is required. The Steiglitz forceps are nice and small and generally will fit into a pulp chamber and allow you to grasp the free end.

Steiglitz Forceps Have a Small Beak for Getting Into Hard to Reach Spaces

Remember, the points are soft, so use firm and constant force to withdraw the point. Try to avoid bending back and forth as this can work harden the silver point and lead to a breakage.

Another technique mentioned in John Rhode’s Textbook, ‘Advanced Endodontics’ (quite a good read for an overview of advanced techniques) is to gently screw a hedstroem file down beside the point to engage it, and then attempt to withdraw the file with point attached.

OK, so what do you do if the point breaks, or you don’t have enough of a tag to grip with Steiglitz forceps, or you simply don’t have Steiglitz forceps? This can also occur if a post has been used and the point has been sheared off apically to the orifice. One method I was forced to try recently was the twisted file method. I’m not sure if this has a formal name (Just checked in Rhode’s Textbook – he calls it “Braiding”). Basically, you place three files alongside the point and twist them so the twisted files grip the point, and then simply pull. I’ve seen this technique described in text books for the removal of separated instruments also.

In this case, I used two Hedstrom files to bind the point, and a third, smaller (size 10) K file. I think the third file helps wrap the other two files around whatever it is you are trying to grab. When using just two files, they can just end up twisting around each other. The softness of the silver points also allows the Hedstrom to lock into the point.

When twisting the files, you need to keep some apical pressure so that they don’t slip off the subject of your grab. You do need to twist the files quite tightly to ensure you have a firm grip.

I’d love to hear thoughts and comments from other dentists and endodontists on their experiences and what method they use to remove silver points when re-treating.

Pat